Wednesday, October 1, 2014

PXE: Freedom with capital F!

During my entertainment with my new virtualization box here, here and here one of obstacles coming into my way was lack of cd-rom drive. Putting installation image on bootable USB stick was tempting, but its all about fun, isn't it? Besides, I always wanted to have network boot environment set up and ready to use for number of purposes, so it looks like perfect occasion to me.

So what's the big deal with PXE? It allows you to boot operating system directly from the network with zero-touch configuration on the machine that you want to boot itself. Its quite easy to setup and with this guide you'll be able to set it up within 15 minutes.

What you need:

  • dhcp server
  • tftp server
  • pxelinux distribution

How it works?

  1. Machine boots up, and its set to PXE network boot
  2. It issues DHCPDISCOVER and waits for the reply
  3. DHCP server assigns IP address, tftp server and tftp image path to it
  4. It configures network stack using provided informations
  5. Then it download specified boot image from tftp server and fire it up
Easy, huh? Let's go straight ahead to the configuration.

I tried two different dhcp servers for this purpose - IOS and (of course) ISC dhcp server. I have also used static dhcp binding to my MAC address.

IOS DHCP:

ip dhcp pool pool-name
 host 192.168.102.20 255.255.255.0
 hardware-address aaaa.bbbb.cccc
 bootfile pxeboot/pxelinux.0
 next-server 192.168.102.10
 domain-name domain.name
 dns-server 8.8.8.8 8.8.8.4
 default-router 192.168.102.1

ISC DHCP: (dhcpd.conf)

allow booting;
allow bootp;

option domain-name "domain.name";
default-lease-time 600;
ddns-update-style none;
authoritative;
log-facility local7;

subnet 192.168.102.0 netmask 255.255.255.0 {
  host hostname {
    hardware ethernet aa:bb:cc:dd:ee:ff;
    fixed-address 192.168.102.20;
    filename "pxeboot/pxelinux.0";
    next-server 192.168.102.10;
  }
}

Setting up IOS dhcp is as simple as entering those commands provided you have IOS device on your network. ISC DHCP may be a little more complicated - you may need to download and configure it from source package but it's a part of probably every single linux distribution. I set it on my macbook using osx ports:

port install dhcp
<edit config file>
launchctl load -F /opt/local/etc/LaunchDaemons/org.macports.dhcpd/org.macports.dhcpd.plist
launchctl start org.macports.dhcpd

Note that if you have any issues with your dhcp.conf it will just silently fail, so it's always a good idea to test it on the very beginning using 

/path/to/dhcpd -cf /path/to/dhcpd.conf -d

It will run in foreground and show you what dhcpd is actually doing.

Ok, so far so good. Now its time for tftp! 

Again, most linux distributions should include one so you need to refer to your documentation to set it up, on os X its a part of the system, so its just a matter of enabling it:

launchctl load -F /System/Library/LaunchDaemons/tftp.plist
launchctl start com.apple.tftpd


Now it listens for incoming connections and servers files found under /private/tftpboot directory.

Okay, so our infrastructure is basically ready for PXE applications. You will find required package here: http://www.syslinux.org. You just need to download latest package and thats it. Then it's time to setup tftp files required to netboot your station.

Without going too much into details, this is what I've done and works for me:

./pxeboot/ldlinux.c32
./pxeboot/libcom32.c32
./pxeboot/libutil.c32
./pxeboot/mboot.c32
./pxeboot/memdisk
./pxeboot/menu.c32
./pxeboot/pxelinux.0

./pxeboot/pxelinux.cfg
./pxeboot/pxelinux.cfg/default
./pxeboot/VMware
./pxeboot/VMware/VMware-VMvisor-Installer-5.5.0.update02-2068190.x86_64.iso

First and most important file is pxelinux.0. Like all of the files in /pxeboot directory, it was copied out from syslinux distribution package. It is boot loader for your host. Then you need to create pxelinux.cfg directory and put config file for your host inside it. If you boot a host from PXE it will look for its configuration file at this directory (details). I want universal configuration, so I just put my config into "default" filename, so it can be eventually loaded by all PXE-enabled hosts.

This is the content of this file:

DEFAULT menu.c32

MENU TITLE PXE Boot Menu
NOHALT 1
PROMPT 0
TIMEOUT 80

LABEL hddboot
 LOCALBOOT 0x80
 MENU LABEL ^Boot from local disk

LABEL install
  KERNEL memdisk
  APPEND iso initrd=VMware/VMware-VMvisor-Installer-5.5.0.update02-2068190.x86_64.iso raw
  MENU LABEL ^ESXi-5.5U2 Install ISO

Again, this is still quite simple if you have any linux boot loader (grub, lilo) background. There are two options specified - local boot and VMware ESXi installer-iso boot.

And this is it! All you need to make sure now is to copy all required files into required places and it's done. Set up your test box for PXE booting and enjoy all new possibilities. I just booted & installed vmware on my WhiteBox using this setup.
Monday, September 29, 2014

Whitebox - Day 0


Finally yesterday all required parts has been delivered to me and I was able to put all of them together. It's been a long time since I last build my own custom PC, so I have to say it was quite exciting. Not only because I did all work myself and there was no expert saying "yes, this is gonna work together", but I've chosen quite a large cpu cooler and I wasn't sure whether it'll fit into the case. Also,  good old times when you were in trouble with your PC you could always get it to your neighbor and swap some parts to identify and shoot troublemaker quickly. Who still have PC at home this days? Especially featuring xeon CPU?


Case arrived first. Unpacked and unwrapped looks really good. And it's pretty wide. Place for 8 HDDs is lot more than I need today. There are silencing pads on top/side walls so it should be quiet and comfortable for environment. There are air filters at every inlet so it should keep my baby clean for the long time.


Not really much to say about PSU except is offers modular cabling (yeah! No more spare cables inside!) and its Bronze 80, supports 550W of energy and all required safety measures.


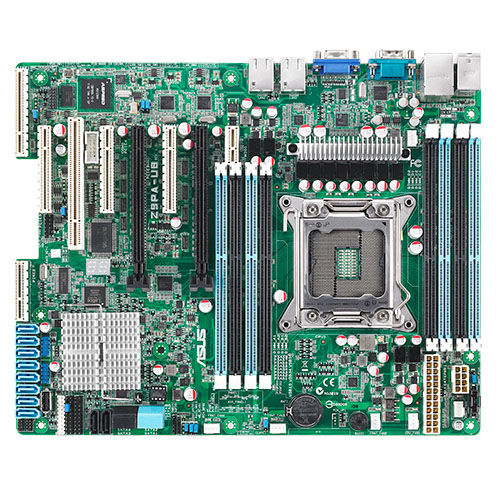
Ok, time for mainboard. This is gonna be one of most important pieces here. Looks pretty small given the features offered. One huge CPU socket, 8 dimms, plenty of hdds connectors. Two Intel GE NICs supported by VMware w/PXE, one additional OOB mgmt gigabit network card (which I am extremely curious of).


There is nothing more to say about CPU. Let's have a picture for the record and move forward.


Okay, things secured, now it's time to attach out cooling unit. This is gonna be the mose difficult part of the operation. Let's have a look. This is monster-class cooling. 


Applying thermal paste was always something that I've never liked. You just put something ugly on your brand-new shiny CPU. But I'd rather have it dirty and cool, then shiny burned.


Installing cooler was kind of pain, but ultimately I've managed it. Now it looks quite good. Only thing left is to install memory put everything into case itself and connect cables. Easier said then done! It turned out that my main PSU 24-pin cable is just as long as needed, which made connecting it little bit hard.


Looks like we have everything in place. I especially like cable management feature of this case. As you can see, there are almost no cables inside to interfere with air flow within the chassis. I've only secured them on the back. In the mean time I put both hard drives into the slots. Yeah, ready to go!


Then I just realized that I don't have screen & keyboard. Even if we have external dedicated mgmt interface or serial console, it has to be configured for the first time! So I just made a call to my neighbor and it was lucky shoot - he told me that he have one and he can give it to me for a couple of days. Perfect! Now we are really ready to go. Everything ready & connected, I decided to record this.

Oh, by the way, sorry for quality of pictures & video. Looks like my phone isn't such a great camera as sales guys promised. Yeah, crapy world. But to the point.


You got it. Didn't work out. Will troubleshoot "b6" tomorrow. Good Night!


Saturday, September 20, 2014

VMware WhiteBox


For at least a year now I was thinking about having dedicated virtualization hardware. I cannot even name all applications that I'd like to use on this box. Today you can literally virtualize everything, even hypervisors (nested ESXi). Just to name some most important:
  • VMware (studies on nested LAB)
  • IOS XR VM's
  • WLC - to rebuild my home wireless network (I have Cisco 2702i SAP)
  • Storage, DLNA, torrent - to replace my old good Qnap TS-212
  • N1kV, vASA and so on
  • Replace my old, good QNAP TS212 with FreeNAS VM
I can probably make this list 5 times longer. Looks like nowadays it's all about virtualization. You may like or not, it's not gonna change. You'd better like it. :)

Anyways, I thought about multiple scenarios. As much as I want to treat this as an investment, I'd still like to minimize associated costs.

I was considering every single platform, starting from old XEON, through all CPU's including AMD AM1 & intel ATOM platform up to current i5/i7 processors. I was trying to share some luns from my QNAP TS212 via iSCSI and boot my HP notebook from those luns, but it revealed to be extremely slow, so I just gave up after few days of trying. Naturally, my main concern was amount of RAM which can possibly be handled by mentioned platforms. I was really convinced to buy Intel Atom Avoton C2550 - 14W TDP, support for 64GB RAM seems to be what I really need. But then surprisingly I've just became owner of brand new Intel Xeon E5-2690-v2 CPU. Kind of 0verkill. 10 physical cores + hyper threading, support for 256GB ram looks to be much more than I actually needs. But it really changed my mindset. Mainboard for brand new Avoton seems to cost as much as for my new Xeon CPU. And I already have CPU. There was no decission to made - I just had to build up server on already owned Xeon CPU. Otherwise I would have three thousands dollars worth keychain.

Okay, so what else do we need to go?

  • Mainboard
  • Case
  • Cooler
  • Power Supply
  • Memory
  • Storage

Mainboard:

After doing quite a lot of research I've decided to go for Asus Z9PA-U8. This is twin baby to Z9PA-D8 which is certified for VMware 5.5 and the only significant difference is 1 CPU socket and ability to have all 256RAM supported by single CPU. I don't really expected to have second identical CPU in nearest future, so I decided to go for single-socket MB.
Case:

The choice was really hard, because there is a bunch of really good cases on the market. My main requirements was lots of 3,5" bays, PSU on the bottom, support for ATX and nice layout - I am gonna put it on my living room (at least for the beginning). It had to be quiet as well. Ocasionally I have guests sleeping there. I also asked my wife about her opinion on this - and finally I decided to buy Fractal Design Define R4


Cooler:

This was really hard one. I want this to be quiet as much as possible. At the other hand my CPU is having 130W TDP. After hours spend on researching this I decided to go for Scythe Grand Kama Cross 2. Yeah, I know that I could have same results for about half of the price, but I just like this brand (I used to have Scythe Katana a while ago) but you know - it looks so cool!


PSU:

Also hard choice. While you want to spent as less as possible, you feel that if you buy cheap PSU you gonna burn your flat to the ground in case of failure. Not only your motherboard. So I just used PSU calculator and figured out, that I need c.a. 300W of power. Plus some reasonable space for the future :) Modular cabling etc. I choose SilentiumPC Duos M1. It has 80+ Bronze and all required safeguards. 550W should be reasonable amount of power.

Memory:

Again, don't ask, but I have three DDR3 ECC-R dimms (2x4GB, 1x8GB) on my desk available to use. Probably in the nearest future I'll go for additional 2x16GB.

Storage:

Re-use. I have two 1TB 7200 RPM HDDs in my QNAP already. I also have 2 500GB 7200 SATA drives (2,5"). I'll start with 2,5" drives. I think that eventually I'll buy another 1TB drive and go for Raid-5.

SUMMARY

So I just ordered Case, Mainboard, Cooler and PSU today. It should allow me to run this box and see whether this is good investment or not. Hopefully it is, so far it cost almost as much as an iPAD AIR.
What I'm gonna do next few weeks is to put all those things together, boot ESXi from SD or USB stick, then the plan is to boot some NAS appliance under ESXi using another usb stick. Then make software raid on HDDs and share them as iSCSI targets to nested ESXi infrastructure.

Stay Tuned, I'll update you after a while to let you know how this works for me. 


Thursday, January 24, 2013

IOS in-place remote interface re-addresing.

Every network engineer sooner or later faces the problem of remote re-addressing. If the interface you need to re-address is the same interface you use to log into the router, you encounter sort of egg and chicken problem.

Imagine that you have remote branch with IOS router connected to DSL service provider. The subnet between your router and service provider router is 192.168.0.0/30. Your router has .1 on the last octet, default route is set to .2.


Thursday, January 17, 2013

Cisco ASA SSL VPN with AnyConnect: From zero to hero!


My favourite way of learning things is to create some very basic configuration, run it, then learn the details by playing around and testing every single feature i find in docs. Unfortunately, most of configuration guides overhelms us with details without giving the big picture. It can dramatically reduce fun of learning new things. Cisco ASA SSL VPN configuration guide is no exception to this rule. You need to read all the docs, then figure out how to start your own configuration.

The goal is to create very-very basic SSL VPN configuration using ASA CLI. Then tweak this configuration to achive basic, but fully functional VPN.